Friday, November 6, 2009

Office 2010 Revealed.......


I had a feeling that 2010 wasn’t going to be an upgrade to Office like what Windows 7 is to the Windows family. Having said that, Office 2010 Technical Preview does show some promising upgrades.


New Splash Screen

You don’t really figure out the awesomeness till you see the close & minimise options & the sleek animation


In between my office time I did find some time to play around with the leaked version of Office 2010 & found some improvements over Office 2007. One of the biggest additions to Office 2010 will be its online collaboration capabilities I wrote about & we have some proof of that in the current Preview build. Here are some noticeable improvements in the technical Preview build:

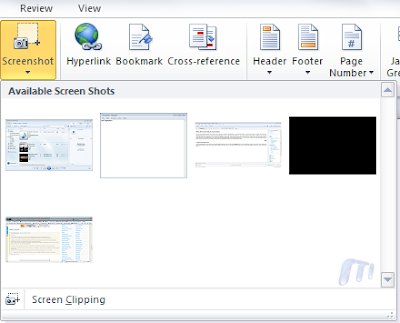
1. Built-In Screen Capture Tool:
A really handy addition & at the same time a beautiful implementation of the same. Word & Powerpoint both have the ‘Screenshot’ feature under ‘Insert’ & the useful part is that it caches screen shots of the currently open windows for one-click insert. At the same time also gives you the marquee select option. Screen shot of the ‘Screenshot’ feature:


2. Background Removal Tool (for images):


This is a feature that I’m sure quite a lot of us will be using. A neat addition to picture properties is ‘Background Removal’. To show you the power of this tool, here is an image that I inserted into a Word 2010 document:


And after using the tool this is what I got:


NOTE: No use of Photoshop AT ALL!
The tool also let’s you have certain amount of background left with edges & effects, screen shot:


Here is the Background Removal tool options tab:


3. Protected Mode:

I found this to be a good addition as a feature. Every time you download a document from the internet & open it, Word 2010 will open it in a ‘Protected mode’ that won’t allow you to edit the document unless you enable editing of the document
You can edit which file types are to be opened in the protect mode from the Trust Center panel. Screenshot:


4. New Smart Art Templates:

I gotta admit, I love ‘Smart Art’. It’s right up there amongst the best features in Office & in Office 2010 there are new templates added. Existing categories have new templates & there’s a new category as well. Screen shot:


5. Author Permissions:

As I had talked about co-authoring a document & collaborating over the Internet will be one of Office 2010’s USPs, the ‘Protect Document’ option under ‘Review’ in Office 2007 has now been renamed to ‘Restrict Editing’ & a new tab titled ‘Block Authors’ has been added. Screen shot of the option in Word 2007 & Word 2010 side-by-side:


6. Completely Revamped Options Under the Office Button:

Office 2010 has introduced a huge a change in the document options that are presented to you under the Office button. One of biggest pains was the meta-data that can be added in a document. Quick access to permissions, document meta-data under document info. With Office 2010 you now have the option of saving your document to a SharePoint location as well. Screen shot:


7. A Kick-Ass Print Control Panel Under the Office Button:

This is a fantastic addition, clicking ‘Print’ under the Office 2010 button opens a plethora of printing options. No need go through a ‘Print Wizard’ you can select all your print options from here & hit print. Screen shot:


8. Jumplists in Outlook 2010:

As you’ll might have seen, Outlook 2010 now makes use of Windows 7’s Jumplist feature for quick access to certain processes. Screen shot:


9. Inserting & Editing Videos Is Painless & Fun:

I’ll be honest, I never really enjoyed inserting videos in my presentations ‘coz it wasn’t a pleasant experience. It sucked. Not anymore, check out these options, screenshot:


10. Compress Media While Saving Presentations

As shown above, the all new file menu, known as — Backstage gives you options to compress the media files inserted in the presentation to reduce file size, it even gives an esitmate of the presentation size. Screenshot:

Windows 7 in USB

hi friends......
This guide works 100% for Vista & Windows 7 unlike most of the guides out there. I have seen many sites/blogs that have “Install Vista from USB guide” but either with incomplete steps or not working guide. I have also seen some guides that don’t’ use proper commands in this guide. After spending many hours I have come up with this 100% working guide.


I just did this method on one of my friends machine and installed the new Windows 7 BETA. The main advantage is that by using USB drive you will be able to install Windows 7/Vista in just 15 minutes. You can also use this bootable USB drive on friend’s computer who doesn’t have a DVD optical drive.
The method is very simple and you can use without any hassles. Needless to say that your motherboard should support USB Boot feature to make use of the bootable USB drive.
Requirements:
*USB Flash Drive (Minimum 4GB)
*Windows 7 or Vista installation files.
Follow the below steps to create bootable Windows 7/Vista USB drive using which you can install Windows 7/Vista easily.
1. Plug-in your USB flash drive to USB port and move all the contents from USB drive to a safe location on your system.
2. Open Command Prompt with admin rights. Use any of the below methods to open Command Prompt with admin rights.
*Type cmd in Start menu search box and hit Ctrl+ Shift+ Enter.
Or
*Go to Start menu > All programs > Accessories, right click on Command Prompt and select Run as administrator.
3. You need to know about the USB drive a little bit. Type in the following commands in the command prompt:
First type DISKPART and hit enter to see the below message.


Next type LIST DISK command and note down the Disk number (ex: Disk 1) of your USB flash drive. In the below screenshot my Flash Drive Disk no is Disk 1.
4. Next type all the below commands one by one. Here I assume that your disk drive no is “Disk 1”.If you have Disk 2 as your USB flash drive then use Disk 2.Refer the above step to confirm it.
So below are the commands you need to type and execute one by one:
SELECT DISK 1
CLEAN
CREATE PARTITION PRIMARY
SELECT PARTITION 1
ACTIVE
FORMAT FS=NTFS
(Format process may take few seconds)
ASSIGN
EXIT
Don’t close the command prompt as we need to execute one more command at the next step. Just minimize it.


5. Next insert your Windows7/Vista DVD into the optical drive and check the drive letter of the DVD drive. In this guide I will assume that your DVD drive letter is “D” and USB drive letter is “H” (open my computer to know about it).
6. Maximize the minimized Command Prompt in the 4th step.Type the following command now:
D:CD BOOT and hit enter.Where “D” is your DVD drive letter.
CD BOOT and hit enter to see the below message.
7. Type another command given below to update the USB drive with BOOTMGR compatible code.
BOOTSECT.EXE/NT60 H:


Where “H” is your USB drive letter. Once you enter the above command you will see the below message.
8. Copy your Windows 7/Vista DVD contents to the USB flash drive.
9. Your USB drive is ready to boot and install Windows 7/Vista. Only thing you need to change the boot priority at the BIOS to USB from the HDD or CD ROM drive. I won’t explain it as it’s just the matter the changing the boot priority or enabling the USB boot option in the BIOS.
Note: If you are not able to boot after following this guide means you haven’t set the BIOS priority to USB. If you got any problem in following this guide feel free to ask questions by leaving comment.


enjoy friends!!!!!!!!!!!!

Thursday, July 23, 2009

Send unlimited free SMS newhere in d world????

hey friends!!

quite shocking ha???
but ya it's true...
now send unlimited SMS around the world and that's for free!!!

SIPphone Inc.,
the makers of Gizmo Project and Gizmo Call, announced earlier this week the launch of its web-based SMS service Gizmo SMS.

juz do visit...........

http://www.gizmosms.com/

but keep in mind"It works with limited web browser"

so juz check it out-->does ur browser support it or not????

Firefox 3.5 out now!

hey friends!!
happy 2 know dat firefox 3.5 is out now....
after long waiting................Mozilla has launched
.........much awaited 3.5 version of da firefox.
if u don't want 2 go upto the site 2 download it........
then juz click on these link n get 3.5 in ur PC....

http://mozilla.mirror.ac.za/firefox/releases/3.5/win32/en-US/Firefox%20Setup%203.5.exe

hurreeeeeyyyyyyyyyyyyyyy.................

enjoy!!!!!!!!!!

Sunday, March 1, 2009

Script to get information about “USERS” from remote computer / server

This small scripts allows to get information from remote computer / server. All data will be saved in XML format. Create a .bat file and put into in the following context:

@Echo off

Rem .
Rem . http://thesystemadministrator.com - http://www.admininfo.ca
Rem .

@Echo Please wait….

SET STOREPATH=C:\TMP
SET RCOMP= “Put here IP or Name of remote computer / server”

set DM=ADMININFO
set USR=ADM
set PASS=PASSWORD

NET USE \\%RCOMP%\ipc$ /user:%DM%\%USR% %PASS% > NUL 2>&1

REM ………. Checking OS Version ……….
For /F “Tokens=1,2,3* Delims= ” %%a in (’@REG QUERY “\\%RCOMP%\HKLM\SOFTWARE\Microsoft\Windows NT\CurrentVersion” /v ProductName^| find /i “ProductName”‘) Do SET OSVER=%%d
IF “%OSVER%” == “Windows 2000″ @Echo %OSVER% &goto :EOF

@echo ^ > %STOREPATH%\%RCOMP%_CompInfo.xml
@echo ^^en^ >> %STOREPATH%\%RCOMP%_CompInfo.xml
@echo ^Report of %RCOMP%^ >> %STOREPATH%\%RCOMP%_CompInfo.xml

REM ………. Users ……….
@echo ^^Users^ >> %STOREPATH%\%RCOMP%_CompInfo.xml
For /F “Tokens=1,2 Delims==” %%a in (’”@WMIC /node:%RCOMP% /user:”%DM%\%USR%” /password:%PASS% USERACCOUNT get NAME /value | find /i “NAME””‘) Do @echo ^^%%a^^%%b^^ >> %STOREPATH%\%RCOMP%_CompInfo.xml
@echo ^
>> %STOREPATH%\%RCOMP%_CompInfo.xml
REM ………. Users ……….

@echo ^
>> %STOREPATH%\%RCOMP%_CompInfo.xml

Note: Remember to set IP or Name of remote computer / server

That it!

Sunday, February 15, 2009

MSI Wind NetOn AP1900 All-In-One PC Launched in India


Said to be the world’s slimmest AIO PC design, it is just 35mm in width and features 160 degrees of wide visual angle with VESA standard wall mount.

It is fueled by the Intel Atom N270 processor and runs on Genuine Windows XP Home operating system. Some of the additional features of the AIO PC are IntelR945GSE+ICH7-M chipset, 2 GB DDR2 533Mhz memory with share memory of up to 228 MB, Intel GMA950 VGA controller and a 160 GB SATA HDD.

Furthermore, the latest Wind NetOn sports features like with an 18.5-inch WSXGA 16:9 LCD Display, 1000:1 contrast ratio, 250 cd/m2 brightness and 5mins response time.

Measuring 550 x 420 x 35mm and weighing 4kg, it packs in features such as a 1.3 megapixel webcam, two HD Audio Speakers, 802.11 b/g Wireless LAN, 10/100/1000 GB LAN, 4-in-1 card reader, 3 USB 2.0 ports, 1 microphone, headphone output and DVD Super-Multi optical drive.

Sporting a shin UB glossy coating design, the MSI Wind NetOn AP1900 All-In-One PC is available in India for Rs. 40,000.

Disable Windows Firewall (Vista edition) from command line

To totally disable Firewall in Vista, execute the following command from command line:

netsh firewall set opmode mode=DISABLE
netsh firewall set opmode mode=DISABLE profile=ALL

Sunday, February 1, 2009

Nano Computers for Rs 500

Today there was a great news for students in india and government likely to offer Nano computers for 500 INR which is around 10 USD.

nano-computer

The above picture is not an official Rs 500 Nano Computer.

Nano computer for Rs 500 developed by Indian Institute of Technology (IIT) Chennai and Indian Institute of Science (IISc), Bangalore.

It seems testing is going on and both the institutes manufacture in collaboration with private firms.

And this Nano computer is a gift to Childrens.

Source : DNA India

Thursday, January 29, 2009

Flash your bios on a pc with no floppy drive


flashcd.iso is an image of a bootable dr-dos 7 cd. In order to make it
usable to also handle your bios flash files it has a cdrom driver and
mscdex.exe loaded. What you will be doing is adding your bios flashing
program and bios file to the .iso and then burning the .iso to cd.


BEGIN WARNING

The best way to flash a bios is using a clean booting 1.44 floppy disk
but lots of pcs are built these days where the manufacturer thought it
was a a cool idea not to include one.

If you have another pc with a floppy drive, you should really first try
copying your bios flash files to a clean, bootable dos floppy and then
burning a boot cd from the boot floppy that contains the flash utilities
and using that cd on your floppyless pc.

Or better yet, see if you can add a floppy disk to your pc.

If the above are not options then using this util and instructions is
another way to address your dilemma.

Please be aware of the possible implications of flashing before you
proceed and ALSO make sure that:

1. The bios flash upgrade from your motherboard maker actually addresses
the problem you are trying to solve.

2. You make a backup of your bios which you should be able to do on your
hard drive but also save the backup to a cd so you can get to it later with
a bootable cd such as this.

END WARNING

There are 2 files in this zippack, this readme and the flashcd.iso file.
If you just burn the .iso as a test you'll see the bootfiles as drive A:
What you are going to do is add your bios flash files to flashcd.iso and
then burn your bootable cd which will include your bios files which will
be seen in drive R: I'd also add the bios backup file you made.

I use UltraISO to do this. It's a free trial. www.ezbsystems.com

To add bios files:

File | Open | Select flashcd.iso | Open | Image windows shows bootable |
Select your bios files in the lower window | Drag to the top window | File |
Save

Note that oddly, the file size of flashcd.iso may not change.

To burn:

File | Open | Click on flashcd.iso | Open | You'll see your bios flash
files on the right | Tools | Burn

Also note that if using another program it's best to use the same program
to copy files to the .iso and use the same program to burn the modified .iso

When you boot with the cd the startup files will be seen as drive A: and
the bios files will be seen as drive R:

Keep in mind that adding files to an .iso is still a new science. Also use
a good brand of media.

REFERENCE FROM:-www.Bootdisk.com


Boot from pen drive without having physical floppy drive

if you don't have a physical floppy drive (and don't want one) you can use the [free] "virtual floppy driver" from here:

http://chitchat.at.infoseek.co.jp/vmware/vfd.html

With that you get an A: drive and can manipulate a floppy image as if you were using real floppy. You can then use that image to make a bootable CD. It's not that user friendly but once you get how it works it does work perfectly.

Even cooler you can use a "raw write" utility like dd for windows to write the floppy image directly to your USB thumb drive. Even without that famous HP utility to do the magic this will make your USB thumb drive bootable. The 'dd' ported to Windows is located here:

http://www.chrysocome.net/dd

Another trick you can use with that dd utility involves MS VritualPC (which is free). You can create a virtual machine/virtual hard drive, set it up the way you want then use dd to "raw write" the virtual hard drive image to the thumb drive; this will make the thumb drive identical to the image, including bootable (again, no HP utilities required).

Of course, your thumb drive will effectively have the capacity the size if the image in question (your 1GB flash drive will effectively be 1.44 Megs).

Boot From A USB Flash Drive

Step 1
Connect USB Pen Drive (256Mb or more)

Step 2
Download and Run USB Disk Storage Format USB Disk Storage Format (34KB)
Screenshot

Step 3
Download and Run grubinst_gui Grub 4 Dos (147KB)
Screenshot

Step 4
Copy grldr and menu.lst to the usb drive
Screenshot

Step 5
Insert the BootCD (9.7) in the CD Drive and Copy everything from CD to USB Flash Drive

Step 6
Test Your USB Drive (read bottom of the page for troubleshoot)


Monday, January 26, 2009

Google Digging:Passwords n Infos

Introduction
This is not about finding sensitive data during an assessment as much as
it is about what the “bad guys” might do to troll for the data.The examples presented
generally represent the lowest-hanging fruit on the security
tree. Hackers target this information on a daily basis.To protect against this type
of attacker, we need to be fairly candid about the worst-case possibilities.We
won’t be overly candid, however.
We start by looking at some queries that can be used to uncover usernames,
the less important half of most authentication systems.The value of a username is
often overlooked, but, an entire multimilliondollar
security system can be shattered through skillful crafting of even the
smallest, most innocuous bit of information.
Next, we take a look at queries that are designed to uncover passwords. Some
of the queries we look at reveal encrypted or encoded passwords, which will take
a bit of work on the part of an attacker to use to his or her advantage.We also
take a look at queries that can uncover cleartext passwords.These queries are some
of the most dangerous in the hands of even the most novice attacker. What could
make an attack easier than handing a username and cleartext password to an
attacker?
We wrap up by discussing the very real possibility of uncovering
highly sensitive data such as credit card information and information used to
commit identity theft, such as Social Security numbers. Our goal here is to
explore ways of protecting against this very real threat.To that end, we don’t go
into details about uncovering financial information and the like. If you’re a “dark
side” hacker, you’ll need to figure these things out on your own.

Searching for Usernames
Most authentication mechanisms use a username and password to protect information.
To get through the “front door” of this type of protection, you’ll need to
determine usernames as well as passwords. Usernames also can be used for social
engineering efforts, as we discussed earlier.
Many methods can be used to determine usernames. In Chapter 10, we
explored ways of gathering usernames via database error messages. In Chapter 8
we explored Web server and application error messages that can reveal various
information, including usernames.These indirect methods of locating usernames
are helpful, but an attacker could target a usernames directory
query like “your username is”. This phrase can locate help pages that describe the
username creation process,
information gleaned from other sources, such as Google Groups posts or phone
listings.The usernames could then be recycled into various other phases of the
attack, such as a worm-based spam campaign or a social-engineering attempt.An
attacker can gather usernames from a variety of sources, as shown in the sample
queries listed
Sample Queries That Locate Usernames

Searching for Passwords
_ Passwords can also be found in a variety locations.
_ A query such as “Your password” forgot can locate pages that provide a
forgotten-password recovery mechanism.
_ intext:(password | passcode | pass) intext:(username | userid | user) is
another generic search for locating password information.

NAPSTY'S FACTORY

1) "save as pdf plugin"
-->download the "save as pdf plugin" bypassing genuine activation
save as pdf office 2007
U can download these by hitting over downlinked website....
http://www.mediafire.com/?brryjmjfb3z

2)Best ever "IDM"
-->best free internet download manager to boost up ur download speed, with multi downloader and all valid stuff, n have incorporated a patch too
internet download manager with crack----->>visit......
http://www.mediafire.com/?7wnentzuh2p

3)
pdf to word
-->convert pdf to word without restrictions , crack included
convert pdf to word with crack

http://www.mediafire.com/?fsmzojyxz1m


4)
lock n protect folder
-->best security software to lock n protect ur folders n files or whatever.
with thief alarm feature and lock the desired program/ software / website whatever u wanna to.
pc security with crack

http://www.mediafire.com/?awtc0xozjgz

5)partitioner
-->hard dsik partitioner with crack
partitions hard disk

link:http://www.mediafire.com/?7v3ltmbvmcj


6)"webcam recorder"
-->record yahoo messenger webcam with this recorder with crack

link:
http://www.mediafire.com/?9gxxpa4yxxt


7)
Buddy check
-->check who is invisible on yahoo with buddy check with crack

link:http://www.mediafire.com/?7yhrzxcdwjw


8)Fake webcam
-->fool yahoo Msn friends with fake webcam
display u r webcam without having one.show them prerecorded videos.
link: http://www.mediafire.com/?0cnlzp1mb4c

9)"save2pc"
-->Here the link of Save2PC software which can capture and save Youtube and Google videos on your PC. Just follow this link....

http://www.mediafire.com/?1g1dxlmmdpd

-