GPMC from Microsoft is the best way to manage the Group Policy of the domain environment.
1. you simply have to download GPMC from Microsoft
http://www.microsoft.com/downloads/details.aspx?FamilyID=0a6d4c24-8cbd-4b35-9272-dd3cbfc81887&displaylang=en
2. Install it on Domain controller
3. Go to Group Policy object and right click the GPO to copy and paste it on the target OU or Domain controller.
For better use of GPMC go through following document
http://download.microsoft.com/download/a/9/c/a9c0f2b8-4803-4d63-8c32-3040d76aa98d/GPMC_Administering.doc
Napster's Networking survivlance
Tuesday, August 17, 2010
Friday, November 6, 2009
Office 2010 Revealed.......

I had a feeling that 2010 wasn’t going to be an upgrade to Office like what Windows 7 is to the Windows family. Having said that, Office 2010 Technical Preview does show some promising upgrades.
New Splash Screen
You don’t really figure out the awesomeness till you see the close & minimise options & the sleek animation

In between my office time I did find some time to play around with the leaked version of Office 2010 & found some improvements over Office 2007. One of the biggest additions to Office 2010 will be its online collaboration capabilities I wrote about & we have some proof of that in the current Preview build. Here are some noticeable improvements in the technical Preview build:
1. Built-In Screen Capture Tool:
A really handy addition & at the same time a beautiful implementation of the same. Word & Powerpoint both have the ‘Screenshot’ feature under ‘Insert’ & the useful part is that it caches screen shots of the currently open windows for one-click insert. At the same time also gives you the marquee select option. Screen shot of the ‘Screenshot’ feature:

2. Background Removal Tool (for images):

This is a feature that I’m sure quite a lot of us will be using. A neat addition to picture properties is ‘Background Removal’. To show you the power of this tool, here is an image that I inserted into a Word 2010 document:

And after using the tool this is what I got:

NOTE: No use of Photoshop AT ALL!
The tool also let’s you have certain amount of background left with edges & effects, screen shot:

Here is the Background Removal tool options tab:

3. Protected Mode:
I found this to be a good addition as a feature. Every time you download a document from the internet & open it, Word 2010 will open it in a ‘Protected mode’ that won’t allow you to edit the document unless you enable editing of the document
You can edit which file types are to be opened in the protect mode from the Trust Center panel. Screenshot:

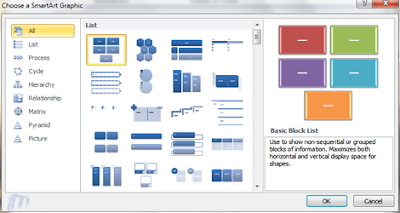
4. New Smart Art Templates:
I gotta admit, I love ‘Smart Art’. It’s right up there amongst the best features in Office & in Office 2010 there are new templates added. Existing categories have new templates & there’s a new category as well. Screen shot:
5. Author Permissions:
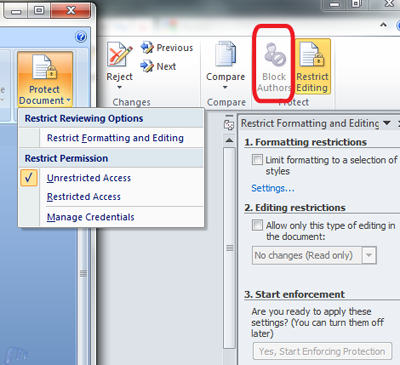
As I had talked about co-authoring a document & collaborating over the Internet will be one of Office 2010’s USPs, the ‘Protect Document’ option under ‘Review’ in Office 2007 has now been renamed to ‘Restrict Editing’ & a new tab titled ‘Block Authors’ has been added. Screen shot of the option in Word 2007 & Word 2010 side-by-side:
6. Completely Revamped Options Under the Office Button:
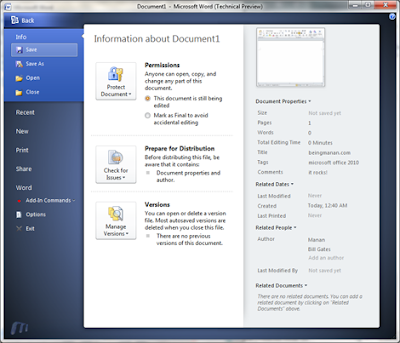
Office 2010 has introduced a huge a change in the document options that are presented to you under the Office button. One of biggest pains was the meta-data that can be added in a document. Quick access to permissions, document meta-data under document info. With Office 2010 you now have the option of saving your document to a SharePoint location as well. Screen shot:
7. A Kick-Ass Print Control Panel Under the Office Button:
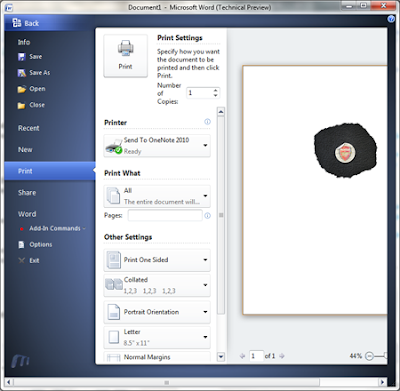
This is a fantastic addition, clicking ‘Print’ under the Office 2010 button opens a plethora of printing options. No need go through a ‘Print Wizard’ you can select all your print options from here & hit print. Screen shot:
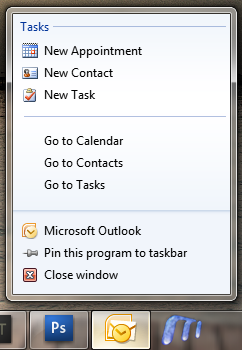
8. Jumplists in Outlook 2010:
As you’ll might have seen, Outlook 2010 now makes use of Windows 7’s Jumplist feature for quick access to certain processes. Screen shot:
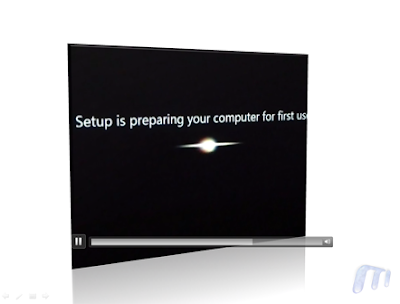
9. Inserting & Editing Videos Is Painless & Fun:
I’ll be honest, I never really enjoyed inserting videos in my presentations ‘coz it wasn’t a pleasant experience. It sucked. Not anymore, check out these options, screenshot:

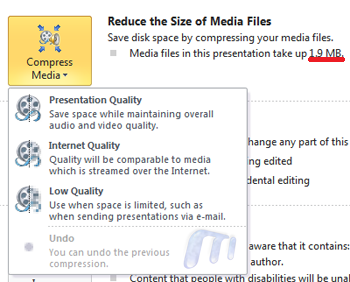
10. Compress Media While Saving Presentations
As shown above, the all new file menu, known as — Backstage gives you options to compress the media files inserted in the presentation to reduce file size, it even gives an esitmate of the presentation size. Screenshot:
Windows 7 in USB
hi friends......
This guide works 100% for Vista & Windows 7 unlike most of the guides out there. I have seen many sites/blogs that have “Install Vista from USB guide” but either with incomplete steps or not working guide. I have also seen some guides that don’t’ use proper commands in this guide. After spending many hours I have come up with this 100% working guide.

I just did this method on one of my friends machine and installed the new Windows 7 BETA. The main advantage is that by using USB drive you will be able to install Windows 7/Vista in just 15 minutes. You can also use this bootable USB drive on friend’s computer who doesn’t have a DVD optical drive.
The method is very simple and you can use without any hassles. Needless to say that your motherboard should support USB Boot feature to make use of the bootable USB drive.
Requirements:
*USB Flash Drive (Minimum 4GB)
*Windows 7 or Vista installation files.
Follow the below steps to create bootable Windows 7/Vista USB drive using which you can install Windows 7/Vista easily.
1. Plug-in your USB flash drive to USB port and move all the contents from USB drive to a safe location on your system.
2. Open Command Prompt with admin rights. Use any of the below methods to open Command Prompt with admin rights.
*Type cmd in Start menu search box and hit Ctrl+ Shift+ Enter.
Or
*Go to Start menu > All programs > Accessories, right click on Command Prompt and select Run as administrator.
3. You need to know about the USB drive a little bit. Type in the following commands in the command prompt:
First type DISKPART and hit enter to see the below message.

Next type LIST DISK command and note down the Disk number (ex: Disk 1) of your USB flash drive. In the below screenshot my Flash Drive Disk no is Disk 1.
4. Next type all the below commands one by one. Here I assume that your disk drive no is “Disk 1”.If you have Disk 2 as your USB flash drive then use Disk 2.Refer the above step to confirm it.
So below are the commands you need to type and execute one by one:
SELECT DISK 1
CLEAN
CREATE PARTITION PRIMARY
SELECT PARTITION 1
ACTIVE
FORMAT FS=NTFS
(Format process may take few seconds)
ASSIGN
EXIT
Don’t close the command prompt as we need to execute one more command at the next step. Just minimize it.

5. Next insert your Windows7/Vista DVD into the optical drive and check the drive letter of the DVD drive. In this guide I will assume that your DVD drive letter is “D” and USB drive letter is “H” (open my computer to know about it).
6. Maximize the minimized Command Prompt in the 4th step.Type the following command now:
D:CD BOOT and hit enter.Where “D” is your DVD drive letter.
CD BOOT and hit enter to see the below message.
7. Type another command given below to update the USB drive with BOOTMGR compatible code.
BOOTSECT.EXE/NT60 H:

Where “H” is your USB drive letter. Once you enter the above command you will see the below message.
8. Copy your Windows 7/Vista DVD contents to the USB flash drive.
9. Your USB drive is ready to boot and install Windows 7/Vista. Only thing you need to change the boot priority at the BIOS to USB from the HDD or CD ROM drive. I won’t explain it as it’s just the matter the changing the boot priority or enabling the USB boot option in the BIOS.
Note: If you are not able to boot after following this guide means you haven’t set the BIOS priority to USB. If you got any problem in following this guide feel free to ask questions by leaving comment.
enjoy friends!!!!!!!!!!!!
This guide works 100% for Vista & Windows 7 unlike most of the guides out there. I have seen many sites/blogs that have “Install Vista from USB guide” but either with incomplete steps or not working guide. I have also seen some guides that don’t’ use proper commands in this guide. After spending many hours I have come up with this 100% working guide.

I just did this method on one of my friends machine and installed the new Windows 7 BETA. The main advantage is that by using USB drive you will be able to install Windows 7/Vista in just 15 minutes. You can also use this bootable USB drive on friend’s computer who doesn’t have a DVD optical drive.
The method is very simple and you can use without any hassles. Needless to say that your motherboard should support USB Boot feature to make use of the bootable USB drive.
Requirements:
*USB Flash Drive (Minimum 4GB)
*Windows 7 or Vista installation files.
Follow the below steps to create bootable Windows 7/Vista USB drive using which you can install Windows 7/Vista easily.
1. Plug-in your USB flash drive to USB port and move all the contents from USB drive to a safe location on your system.
2. Open Command Prompt with admin rights. Use any of the below methods to open Command Prompt with admin rights.
*Type cmd in Start menu search box and hit Ctrl+ Shift+ Enter.
Or
*Go to Start menu > All programs > Accessories, right click on Command Prompt and select Run as administrator.
3. You need to know about the USB drive a little bit. Type in the following commands in the command prompt:
First type DISKPART and hit enter to see the below message.

Next type LIST DISK command and note down the Disk number (ex: Disk 1) of your USB flash drive. In the below screenshot my Flash Drive Disk no is Disk 1.
4. Next type all the below commands one by one. Here I assume that your disk drive no is “Disk 1”.If you have Disk 2 as your USB flash drive then use Disk 2.Refer the above step to confirm it.
So below are the commands you need to type and execute one by one:
SELECT DISK 1
CLEAN
CREATE PARTITION PRIMARY
SELECT PARTITION 1
ACTIVE
FORMAT FS=NTFS
(Format process may take few seconds)
ASSIGN
EXIT
Don’t close the command prompt as we need to execute one more command at the next step. Just minimize it.

5. Next insert your Windows7/Vista DVD into the optical drive and check the drive letter of the DVD drive. In this guide I will assume that your DVD drive letter is “D” and USB drive letter is “H” (open my computer to know about it).
6. Maximize the minimized Command Prompt in the 4th step.Type the following command now:
D:CD BOOT and hit enter.Where “D” is your DVD drive letter.
CD BOOT and hit enter to see the below message.
7. Type another command given below to update the USB drive with BOOTMGR compatible code.
BOOTSECT.EXE/NT60 H:

Where “H” is your USB drive letter. Once you enter the above command you will see the below message.
8. Copy your Windows 7/Vista DVD contents to the USB flash drive.
9. Your USB drive is ready to boot and install Windows 7/Vista. Only thing you need to change the boot priority at the BIOS to USB from the HDD or CD ROM drive. I won’t explain it as it’s just the matter the changing the boot priority or enabling the USB boot option in the BIOS.
Note: If you are not able to boot after following this guide means you haven’t set the BIOS priority to USB. If you got any problem in following this guide feel free to ask questions by leaving comment.
enjoy friends!!!!!!!!!!!!
Subscribe to:
Comments (Atom)